Doppio gateway e impostazione di una scheda di rete come primaria
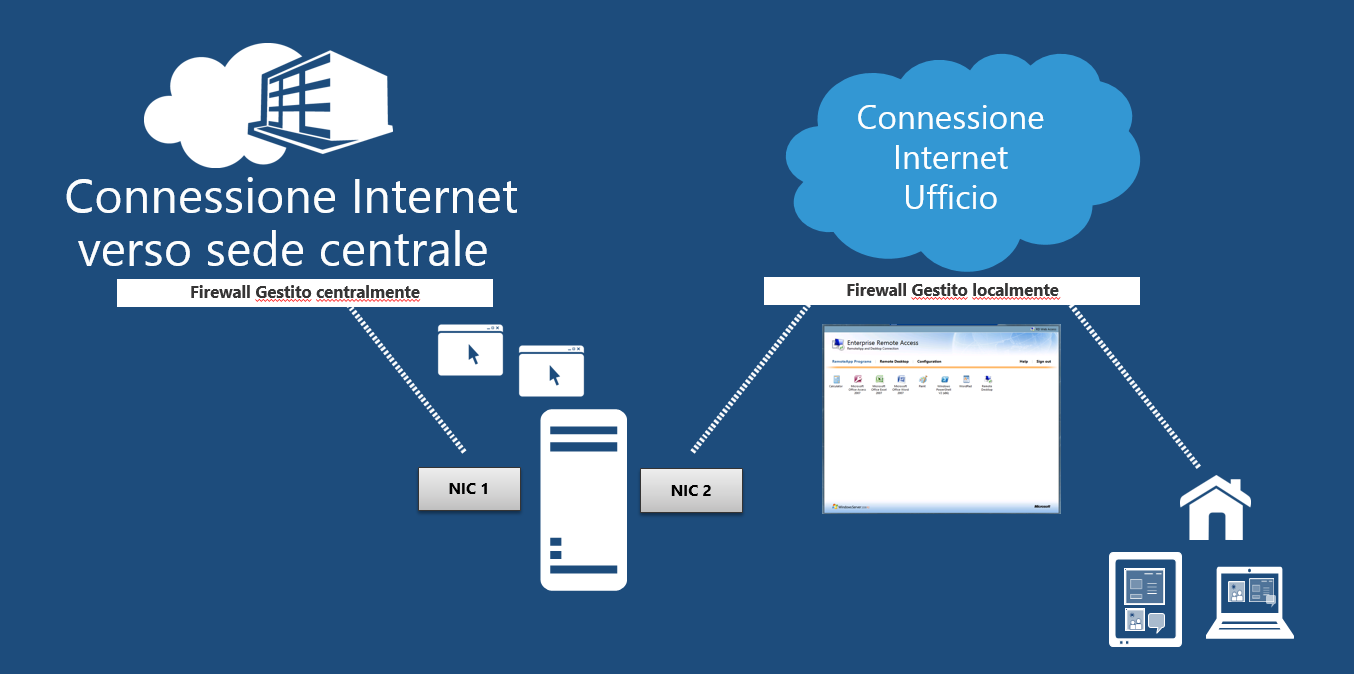
In scenari particolari può capitare di dover usare due schede di rete per connettersi a due reti pubbliche diverse. Per esempio in scenari dove esiste una rete Intranet che fornisce servizi ma che è connessa a firewall su cui non abbiamo il controllo e una rete Internet dedicata alla sede locale su cui si ha il pieno controllo.
Un esempio di questi scenari possono essere le agenzie di pratiche auto o gli gli studi di broker assicurativi o finanziari, in cui vengono utilizzati applicativi web mediante una connessione Internet che molto spesso è gestita dal gruppo di cui lo studio fa parte o di cui rivende/commercializza i servizi. Tale connessione Internet per motivi di sicurezza molto spesso viene fornita agli studi con un firewall gestito remotamente e tramite cui è ammesso solo il traffico necessario per l’utilizzo degli applicativi ed eventualmente la navigazione Internet. Quindi se ad esempio lo studio volesse utilizzare gli applicativi remotamente tramite RDS deve avere una seconda connessione Internet a suo uso e consumo tramite cui pubblicare Remote App o sessioni RDS.
In uno scenario del genere di solito si hanno due schede di rete connesse appunto ai due Firewall, con ciascuna un Gateway definito che sarà IP locale del rispettivo Firewall. Quindi nasce il problema di far si che il traffico per l’utilizzo degli applicativi web sia gestito da una scheda di rete (NIC 1 nell’immagine), mentre il traffico per la pubblicazione Remote App/RDS dal una seconda scheda di rete (NIC 2 nell’immagine).
Infatti come descritto nella KB159168 Multiple Default Gateways Can Cause Connectivity Problems Windows utilizza in realtà un solo Gateway, mentre ulteriori gateway verrà utilizzati solo come failover:
“When multiple default gateways are used in TCP/IP configuration options on a Windows NT computer, connectivity to computers on remote networks may be lost. On multihomed computers connected to disjointed networks, static routes may be added to the routing table to get connectivity to remote networks.”
Per assicurarsi che i due tipi di traffico vengano instradati correttamente è possibile eseguire la seguenti impostazioni.
Passo1: impostare la scheda di rete primaria
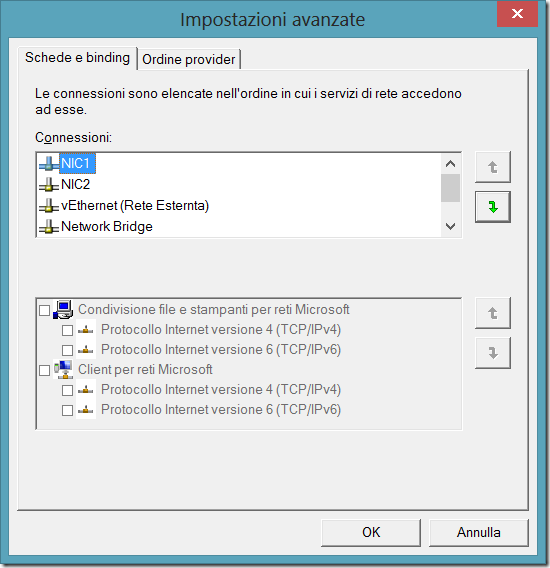
Se si è nel caso che NIC 1 gestisce di fatto tutto il traffico mentre la NIC 2 è chiamata in causa solo quando i client remoti accedono al server per usufruire di Remote App e sessioni RDS è possibile impostare la NIC 1 come prima scheda di rete tramite l’applet delle Connessioni di rete (ncpa.cpl)
Come riportato nella KB 894564 How to change the binding order of network adapters in Windows XP and in Windows 2000 la scheda di rete impostata come prima nell’elenco “Schede e binding” sarà la scheda che prima verrà processata dai servizi di rete e quindi riferendoci al nostro esempio occorre impostare come prima scheda la NIC 1 soprattutto se il server è utilizzato anche nella LAN dell’ufficio:
“The Adapters and Bindings tab lists the connections in the order in which the connections are accessed by network services. The order of these connections reflects the order in which TCP/IP or the next available protocol is bound to the network adapters. The bindings for remote access connections apply to all remote access connections.”
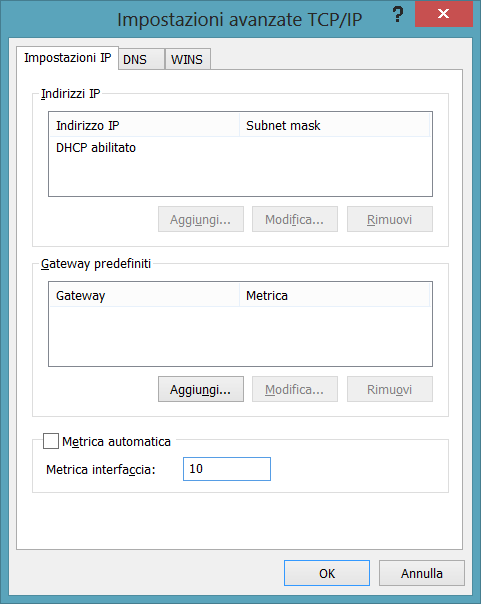
In realtà questa impostazione non è sufficiente perché per default sul protocollo TCP/IP è abilitata la metrica automatica che implica che quando ci si collega ad host venga utilizzata la scheda che ha la connessione più veloce, dal momento che entrambe le NIC hanno un gateway se non si va a modificare la metrica potrebbe accadere che venga utilizzata la NIC 2 per accedere agli applicativi web se la connessione Internet dell’ufficio è più veloce di quella verso la sede centrale.

Quindi si potrebbe pensare di assegnare una metrica di 10 alla NIC 1 e una di 20 alla NIC 2, infatti come riportato nella KB 894564 How to change the binding order of network adapters in Windows XP and in Windows 2000 verrà selezionata la scheda di rete con metrica inferiore:
“You can change the interface metric on a network adapter if you are using TCP/IP as a transport protocol because TCP/IP uses the interface metric to determine the order. You can change the interface metric to make one network adapter more favorable for all TCP/IP connections. The interface metric (IPConnectionMetric) for a network connection indicates the cost of using the routes in the IP routing table. The routes are derived from the interface configuration. The cost becomes the value in the Metric column for those routes in the IP routing table. If there are multiple routes that are a close match for the route to a destination in the IP routing table, the route that has the lowest metric is used. The range of valid values is 1 through 9999.”
Per quanto riguarda invece il traffico RDS e RemoteApp proveniente dai client remoti, verrà comunque gestito correttamente in quanto le connessioni verranno aperte da remoto e instradate tramite il Firewall gestito localmente direttamente sulla NIC 2 e quindi sarà quest’ultima a gestirne le risposte.
Passo 2: impostare le route per la gestione corretta del traffico
Come suggerito nella KB159168 Multiple Default Gateways Can Cause Connectivity Problems, è possibile impostare delle route per assicurarsi che determinato traffico venga indirizzato sulla scheda di rete corretta.
Ad esempio nel nostro scenario sebbene il traffico RDS e RemoteApp dovrebbe venire gestito correttamente per default è possibile impostare come gateway da utilizzare quello della NIC 2 quando si vuole accedere all’IP pubblico della connessione Internet dell’ufficio tramite cui sono pubblicate RemoteApp e sessioni RDS:
“Consider a computer with two network cards, Netcard1 and Netcard2, and the following IP addresses and default gateways:
Netcard1:
IP Address: 11.100.1.1
Mask: 255.255.0.0
Default Gateway: 11.100.0.1 11.100.0.2Netcard2:
IP Address: 11.200.1.1
Mask: 255.255.0.0
Default Gateway: 11.200.0.1If you want to Telnet to a workstation with an IP address of 130.20.20.100, the IP datagrams will be routed through the 11.100.0.1 gateway. If 11.100.0.1 is detected as unavailable, IP switches to the second gateway 11.100.0.2. When this gateway fails, then use 11.200.0.1, and so on. This applies only to TCP traffic and switching gateways occurs based on the mechanism described earlier. Telnet, FTP, and NetBIOS Session service network traffic use TCP for network communications.
Also consider where the two networks connected to Netcard1 and Netcard2 are disjointed (that is, not connected to each other through any other router). If there is a network (say 22.101.x.x) that is accessible only through Netcard2, the IP datagrams for this network will still be routed through 11.100.0.1 because it is the primary default gateway. To route IP datagrams destined to network 22.101.x.x through 11.200.0.1, a static route needs to be added to the routing table through the ROUTE utility. To add the route, type the following command:
route add 22.101.0.0 MASK 255.255.0.0 11.200.0.1”


[…] Per ulteriori informazioni si veda anche il mio post Doppio gateway e impostazione di una scheda di rete come primaria. […]